
In this guide to Kratky hydroponics for beginners, we’ll look at how this simple no-pump growing method works, what you need to get started, how to manage water and nutrients, and which crops are easiest to grow.
Kratky hydroponics is appealing because it strips hydroponic growing back to the basics. There is no pump, no air stone, no timer and no complicated pipework.
In its simplest form, a plant sits above a container of nutrient water. As the plant grows, it drinks the water down, leaving an air gap around the roots. That air gap is what allows this passive system to work.
It is especially good for leafy crops and herbs, where you want fresh growth without building a full hydroponic system.
The main thing to understand is that Kratky is simple, but it is not magic. The plant still needs enough light, the right nutrient mix, a suitable water level and enough space for its roots.
Get those basics right and it can work surprisingly well.
If you’re not sure whether the Kratky method is the right option, start with our guide to the different types of hydroponic growing. It explains the main systems, how they work, and which ones make most sense for beginners.
What Is Kratky Hydroponics?
Kratky hydroponics is a passive hydroponic growing method.
That means the plant grows in water with added nutrients, but there is no pump moving the water around and no air stone bubbling oxygen into the container.
Instead, the system relies on an air gap inside the container.
The lower roots hang down into the nutrient solution and take up water and nutrients. The upper roots sit above the waterline in the moist air space, where they can access oxygen.
As the plant grows, it drinks the nutrient solution. The water level drops, the air gap gets larger, and the roots adapt.
That air gap is the key to the whole method. Without it, the roots can become short of oxygen.
Why Kratky Is Good for Beginners
The main advantage of Kratky hydroponics is that there are very few moving parts.
You are not trying to balance pumps, emitters, pipework, timers or flowing water. You are mainly learning the core hydroponic basics: light, nutrients, water level, roots and plant choice.
For a beginner, that is useful. It lets you see how plants behave in a hydroponic setup without making the whole thing feel too technical.
Kratky is useful because:
- There is no water pump.
- There is no air pump or air stone.
- It is quiet enough for kitchens, shelves and spare rooms.
- It can be cheap to set up.
- It works well in small spaces.
- It suits herbs, lettuce and leafy greens.
- It can be tried in jars, tubs, buckets or small hydroponic planters.
The limitation is that Kratky is not the best system for every crop.
It suits smaller, faster-growing plants better than large fruiting plants. A lettuce or basil plant is much easier than a full-sized tomato plant.
A Simple Way to Think About It
A Kratky setup is basically a still reservoir of nutrient water with a plant sitting above it.
At the start, the young plant needs the water close enough to reach. Later, once roots have grown down, the water level is allowed to fall.
That falling water level creates the oxygen zone.
So the beginner rule is:
Do not keep filling the container right back to the top once the plant has developed roots.
That is one of the most common mistakes. It feels helpful, but it can drown the air roots.
What You Need for a Basic Kratky Setup
You can make a Kratky system with very little equipment.
For a first attempt, this is enough:
- A container
- A lid or net cup
- A growing plug or support medium
- Hydroponic nutrients
- Water
- A suitable plant
- Enough light
You do not need to buy a large hydroponic kit. For lettuce, basil or small herbs, a simple container can work.
The container does need to be suitable, though. It should hold enough water, support the plant securely and block light from reaching the nutrient solution.
Light reaching the water encourages algae, which is why opaque or amber containers usually work better than clear jars.
| Item | What it does | Beginner tip |
|---|---|---|
| Container | Holds the nutrient solution. | Use an opaque jar, tub or bucket. If it is clear, cover it to block light. |
| Net cup or lid | Supports the plant above the water. | Make sure the plant is held firmly so young seedlings do not collapse. |
| Growing plug or medium | Supports the roots and stem while the plant gets established. | Hydroponic sponges, plugs or clay pebbles are easy beginner options. |
| Hydroponic nutrients | Feeds the plant through the water. | Use a hydroponic feed, not a normal compost or houseplant fertiliser. |
| Light | Powers plant growth. | A bright windowsill may work for herbs, but a small grow light is more reliable indoors. |
Container
What it does: Holds the nutrient solution.
Beginner tip: Use an opaque jar, tub or bucket. If it is clear, cover it to block light.
Net cup or lid
What it does: Supports the plant above the water.
Beginner tip: Make sure the plant is held firmly so young seedlings do not collapse.
Growing plug or medium
What it does: Supports the roots and stem while the plant gets established.
Beginner tip: Hydroponic sponges, plugs or clay pebbles are easy beginner options.
Hydroponic nutrients
What it does: Feeds the plant through the water.
Beginner tip: Use a hydroponic feed, not a normal compost or houseplant fertiliser.
Light
What it does: Powers plant growth.
Beginner tip: A bright windowsill may work for herbs, but a small grow light is more reliable indoors.
If you would rather start with a ready-made system instead of building your own jar or tub setup, see our guide to the best hydroponic growing systems in the UK. It covers beginner-friendly indoor units that include the container, light, pump or growing spaces in one setup.
Choosing a Container
You can use jars, plastic tubs, buckets, food containers or purpose-made hydroponic planters.
For small herbs and lettuce, a jar or small tub can work well. For bigger plants, use a deeper container with more water capacity.
The container should ideally be opaque. If you use a clear jar, wrap it in foil, paper, card or dark tape. This helps stop light reaching the nutrient solution.
That matters because algae can grow quickly when light, water and nutrients are all present.
Algae is not always an immediate disaster, but it competes for nutrients, looks messy and can make the water deteriorate more quickly.
Choosing a Net Cup or Lid
The plant needs to sit above the container with its roots hanging down.
Net cups are the easiest option because they hold the plant and growing medium while allowing roots to grow through the sides and bottom.
You can also cut a hole in a plastic lid, but be careful with sizing. If the hole is too wide, the seedling can wobble or collapse.
This is especially important with herbs like basil, where young stems can be soft and top-heavy.
Choosing a Growing Medium
In Kratky hydroponics, the growing medium does not feed the plant.
It mainly supports the seedling and helps keep the young roots in the right place.
Common options include:
- Hydroponic sponges
- Rockwool cubes
- Coco plugs
- Clay pebbles
- Perlite
For most beginners, hydroponic sponges or plugs are the easiest starting point. Seeds can be started in them, and then the plug can be placed into a net cup.
Clay pebbles are useful for holding the plug steady.
Using Hydroponic Nutrients
Plain water is not enough for Kratky growing.
The plant needs hydroponic nutrients mixed into the water. These provide the minerals the plant would normally get from soil or compost.
Use a feed designed for hydroponics. Normal houseplant feed or general garden fertiliser is not always suitable because hydroponic roots are taking everything directly from the water.
For beginners, it is usually better to start slightly weak rather than too strong, especially with seedlings.
Too much nutrient can cause brown leaf tips, stunted growth or stressed roots.
How the Water Level Should Work
The water level is the part of Kratky growing that beginners most often get wrong.
At the beginning, the nutrient solution should just touch the bottom of the growing plug or the lowest young roots.
The seedling needs access to moisture, but it should not be deeply submerged.
As the roots grow down into the water, allow the water level to drop naturally. This creates the air gap.
Once a plant has developed air roots, avoid filling the container all the way back up to the top. You can top it up later if needed, but leave a clear air space below the lid.
A simple beginner rule:
- At the start, water can touch the plug.
- Once roots are established, keep an air gap.
- Later, top up only part way if the water gets too low.
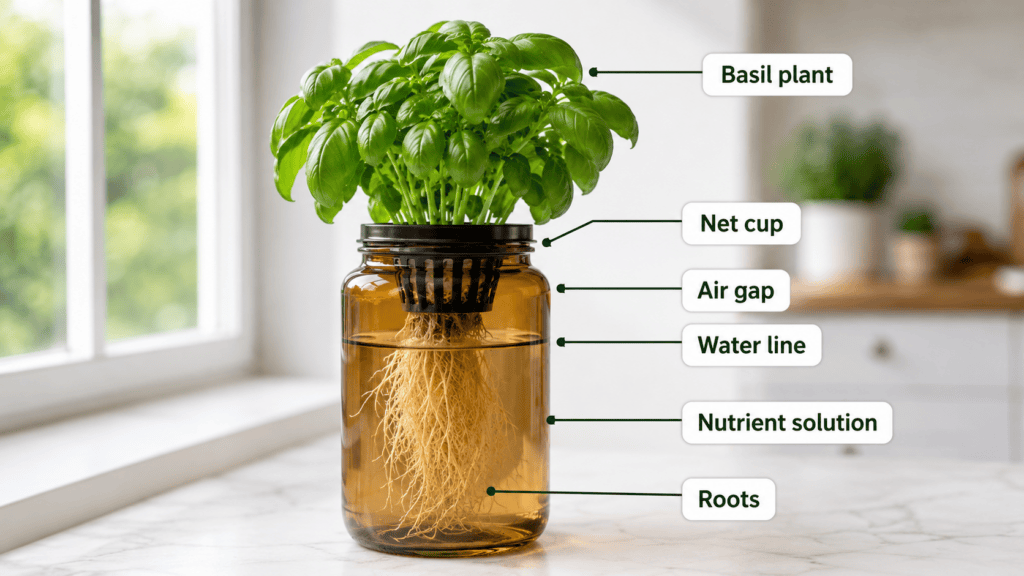
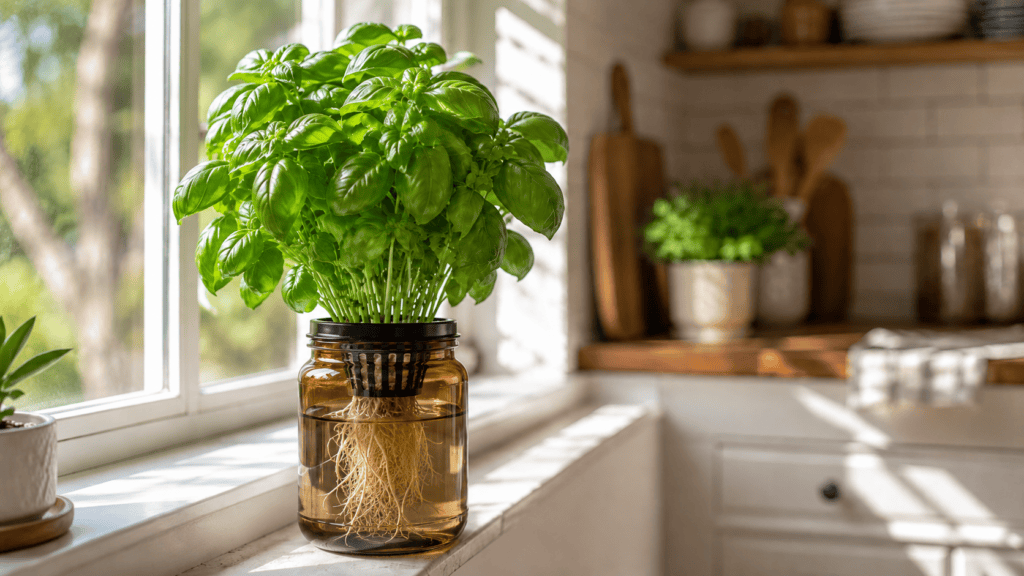
A Kratky basil setup showing the net cup, air gap, water line, nutrient solution and roots inside an amber jar.
Do You Need to Change the Water?
For small, quick crops, Kratky is often treated as a “fill once and harvest” method.
That means you mix the nutrient solution at the beginning, grow the crop, then harvest before the reservoir becomes a long-term problem.
This works best for lettuce, basil and smaller herbs.
For longer-growing plants, or if anything looks wrong, changing the water can be useful.
Change the water if:
- It smells stale or unpleasant.
- There is heavy algae growth.
- The roots look slimy.
- The plant is yellowing despite decent light.
- The crop has been growing for several weeks.
- The container looks dirty.
- The plant has slowed down for no obvious reason.
To change the water, lift the plant and net cup carefully, empty the container, rinse it, refill with fresh nutrient solution, and place the plant back.
Try not to damage the roots.
Topping Up vs Changing Water
Topping up and changing water are not the same thing.
Topping up means adding more water or nutrient solution to the existing container.
Changing water means emptying the container and replacing the solution properly.
Topping up is useful when the water level is getting too low but the plant still needs time to grow.
However, do not top it right back to the lid once the plant has developed air roots.
Leave a clear air gap.
| Situation | What to do | Why it matters |
|---|---|---|
| New seedling with short roots | Keep the solution just touching the plug or root tips. | The young plant needs moisture before roots have grown down. |
| Roots have reached the water | Allow the water level to fall naturally. | This creates the air gap that supplies oxygen to the upper roots. |
| Water level is very low | Top up part way, leaving an air gap. | This gives the plant more water without drowning the air roots. |
| Water smells bad or roots look slimy | Empty, rinse and refill with fresh nutrient solution. | Stale water and unhealthy roots can quickly damage the plant. |
| Fast crop is nearly ready to harvest | Often you can leave it and harvest soon. | Many small Kratky crops are grown as short “fill once and harvest” plants. |
New seedling with short roots
What to do: Keep the solution just touching the plug or root tips.
Why it matters: The young plant needs moisture before roots have grown down.
Roots have reached the water
What to do: Allow the water level to fall naturally.
Why it matters: This creates the air gap that supplies oxygen to the upper roots.
Water level is very low
What to do: Top up part way, leaving an air gap.
Why it matters: This gives the plant more water without drowning the air roots.
Water smells bad or roots look slimy
What to do: Empty, rinse and refill with fresh nutrient solution.
Why it matters: Stale water and unhealthy roots can quickly damage the plant.
Fast crop is nearly ready to harvest
What to do: Often you can leave it and harvest soon.
Why it matters: Many small Kratky crops are grown as short “fill once and harvest” plants.
Do You Need to Check pH?
Kratky hydroponics works best when the nutrient solution is in a suitable pH range for hydroponic growing.
In practice, many beginners start without measuring pH, especially when growing simple herbs or lettuce.
That is fine for a first experiment, as long as expectations are realistic.
If your plants repeatedly yellow, stall, twist or fail despite decent light and fresh nutrient solution, pH is worth checking.
A pH meter or liquid pH test kit can help, but you do not need to turn your first Kratky jar into a science project.
Start simple. Add testing later if you want more control.
How Much Light Does Kratky Need?
Kratky is a water and nutrient system. It does not remove the need for light.
This is a common beginner misunderstanding.
A plant in a Kratky jar still needs enough light to photosynthesise. Without it, seedlings stretch, lean, turn pale and become weak.
A bright windowsill can work for some herbs and leafy crops, especially in brighter months. But indoor light is often weaker than it looks to us.
For reliable indoor growing, a small LED grow light is usually better. You do not necessarily need a powerful grow light for lettuce, basil and leafy herbs, but you do need steady light close enough to keep the plants compact.
If you want to compare proper indoor growing lights, see our guide to the best LED grow lights in the UK. For a small Kratky jar, herbs or lettuce, our guide to the best cheap grow lights may be a better starting point.
Signs that your Kratky plant needs more light include:
- Long, thin stems
- Pale leaves
- Leaning towards the window
- Slow growth
- Seedlings falling over
- Leaves that stay small
For leafy greens and herbs, you do not need an intense fruiting light. You just need steady, close, suitable light that keeps the plant compact.
What Can You Grow with Kratky Hydroponics?
Kratky hydroponics is best for compact, leafy, fast-growing plants.
These crops do not need huge root systems, heavy support or months of feeding.
Lettuce and basil are probably the best first choices. They grow quickly, show problems clearly and do not need a huge container.
| Crop | Beginner suitability | Notes |
|---|---|---|
| Lettuce | Excellent | One of the easiest Kratky crops. Best harvested young and fresh. |
| Basil | Excellent | Very suitable if it has enough light and warmth. Pinch tips to encourage bushy growth. |
| Mint | Good | Usually vigorous, but give it enough space because it can grow quickly. |
| Parsley | Good | Slower than basil or lettuce, but possible in a steady setup. |
| Coriander | Moderate | Can bolt quickly if too warm or stressed. |
| Rocket | Moderate | Grows quickly, but can stretch or flower early in heat. |
| Pak choi | Good | Works well as a leafy crop, especially when harvested young. |
| Spinach | Moderate | Can work, but dislikes heat and may bolt in warm indoor spaces. |
| Dwarf tomatoes | Challenging | Possible in a larger container with strong light, but not the easiest first crop. |
| Chillies and peppers | Challenging | Need more light, time, nutrients and root space than leafy crops. |
Lettuce
Beginner suitability: Excellent
Notes: One of the easiest Kratky crops. Best harvested young and fresh.
Basil
Beginner suitability: Excellent
Notes: Very suitable if it has enough light and warmth. Pinch tips to encourage bushy growth.
Mint
Beginner suitability: Good
Notes: Usually vigorous, but give it enough space because it can grow quickly.
Parsley
Beginner suitability: Good
Notes: Slower than basil or lettuce, but possible in a steady setup.
Coriander
Beginner suitability: Moderate
Notes: Can bolt quickly if too warm or stressed.
Rocket
Beginner suitability: Moderate
Notes: Grows quickly, but can stretch or flower early in heat.
Pak choi
Beginner suitability: Good
Notes: Works well as a leafy crop, especially when harvested young.
Spinach
Beginner suitability: Moderate
Notes: Can work, but dislikes heat and may bolt in warm indoor spaces.
Dwarf tomatoes
Beginner suitability: Challenging
Notes: Possible in a larger container with strong light, but not the easiest first crop.
Chillies and peppers
Beginner suitability: Challenging
Notes: Need more light, time, nutrients and root space than leafy crops.
Best Crops for a First Kratky Setup
For a first attempt, keep it simple.
The best beginner crops are:
- Lettuce
- Basil
- Pak choi
- Mint
- Parsley
- Small leafy greens
These crops make sense because they are relatively quick, compact and forgiving.
You can harvest them young, learn from the setup, and then try something more ambitious later.
Crops That Are Possible But Harder
Some people grow tomatoes, chillies, peppers, cucumbers and strawberries with Kratky-style systems.
That does not mean they are the best beginner crops.
Fruiting plants need stronger light, more nutrients, a larger reservoir and more support. They also grow for longer, which means there is more time for nutrient imbalance, water problems or root stress.
If you want to experiment, choose compact varieties and use a much larger container than you would for lettuce.
A tiny jar is not enough for a serious tomato plant.
Crops Kratky Is Not Ideal For
Kratky is not well suited to large, hungry or space-demanding crops.
It is usually not the best choice for:
- Large tomato plants
- Courgettes
- Pumpkins
- Sweetcorn
- Large brassicas
- Carrots
- Parsnips
- Maincrop potatoes
These crops either need too much space, too much water, too much support or a different root environment.
That does not mean they cannot be grown hydroponically at all. It just means a simple passive jar or bucket is not the most sensible method.
Step-by-Step: How to Set Up a Kratky System
Step 1: Choose your crop
Start with lettuce or basil. Both are much more forgiving than tomatoes or peppers.
A small leafy crop will teach you how the system works without needing a big reservoir, strong light or months of maintenance.
Step 2: Prepare the container
Choose a jar, tub or bucket. If it is clear, cover the outside so light cannot reach the water. Foil, card, paper or dark tape can all work.
Make sure the lid or net cup fits securely. The plant should sit upright without falling through.
Step 3: Start the seedling
You can start seeds in hydroponic sponges, plugs or cubes.
Keep the plug moist while the seed germinates. Once the seedling has roots showing, it can go into the Kratky container.
You can also use a small young plant, but remove soil carefully if it has been grown in compost. Soil in a hydroponic reservoir can make the water dirty.
Step 4: Mix the nutrient solution
Add water to the container and mix in hydroponic nutrients according to the product instructions.
For very young plants, use a weaker mix rather than going too strong. Do not assume more feed means faster growth. In hydroponics, too much nutrient can cause problems quickly.
Step 5: Set the water level
For a new seedling, the water should just touch the bottom of the plug or the lowest roots.
You want the plant to reach moisture, not sit drowned in water. Once the roots grow down, let the level drop naturally.
Step 6: Place the plant in position
Put the plug or seedling into the net cup or lid.
Use clay pebbles or another support if the seedling is loose. The stem should be upright and stable.
If the plant wobbles, fix that early. A weak, unsupported seedling often collapses as the leaves get larger.
Step 7: Add light
Place the setup in a bright position or under a grow light.
For indoor herbs and lettuce, a small LED grow light can make the difference between compact growth and weak, stretched seedlings.
Keep the light close enough to be useful, but not so close that the leaves curl, bleach or dry out.
Step 8: Watch the roots and water level
Over the next few days and weeks, watch how the roots develop.
Healthy roots should grow down into the nutrient solution. As the plant drinks, the water level should fall. This is normal.
Do not panic and refill it to the top every time the level drops.
Step 9: Harvest at the right time
For lettuce and leafy greens, it is often best to harvest young and fresh.
You can take individual outer leaves or harvest the whole plant, depending on the crop.
Basil can be pinched from the top to encourage bushier growth.
Common Kratky Problems
Seedlings stretch and fall over
This usually means the light is too weak or too far away.
Move the plant closer to a grow light or into a brighter position. Weak seedlings often struggle later even if the water and nutrients are correct.
The plant collapses
This can happen if the seedling is not supported properly, the plug is too loose, the hole is too wide or the roots are not yet reaching water.
Check the support first. Then check the water level.
The water turns green
This is usually algae.
Block light from the nutrient solution. Use an opaque container or cover clear containers properly. Also cover unused holes in lids.
The roots look brown
Some nutrient staining is normal, especially with certain feeds.
But slimy, smelly or mushy roots are a warning sign. Empty and clean the container, replace the nutrient solution, and make sure there is still an air gap.
Leaves turn yellow
Yellow leaves can have several causes.
The most common are weak light, old nutrient solution, low nutrient strength, poor pH or root stress.
Start with the simple checks: light, smell, root health, water level and whether the container is too warm.
Leaf tips turn brown
Brown tips can be caused by nutrient solution that is too strong, heat stress, lack of water, or root problems.
If you are new to Kratky, do not keep adding extra feed every few days. That can make things worse.
The plant flowers too early
Rocket, coriander, parsley and some leafy greens can bolt if they are too warm, stressed or short of water.
Indoor growing spaces can get surprisingly hot, especially near sunny glass or in a conservatory.
Once a leafy crop bolts, the flavour often becomes stronger or more bitter.
Kratky in UK Homes: Practical Notes
Kratky can work well in UK homes, but indoor conditions vary a lot.
A kitchen windowsill in winter is very different from a warm conservatory in late spring.
The two most common problems are weak light and excess heat.
Weak light causes stretching. Too much heat can cause bolting, wilting or fast water use.
For leafy crops, a steady indoor shelf with a small grow light may be better than a very hot sunny windowsill.
Also remember that small containers change quickly. A little jar can run low on water much faster than expected once the plant gets bigger.
For a first setup, it is often easier to use a slightly larger container than you think you need.
Kratky vs Pump-Based Hydroponics
Kratky is simpler than most other hydroponic systems because it does not actively move or oxygenate the water.
That makes it cheap, quiet and beginner-friendly.
The trade-off is that you have less control.
Pump-based systems can support larger plants more easily because oxygen and nutrients are constantly circulated. Kratky relies on the air gap and root adaptation.
For herbs and lettuce, that can be enough.
For bigger fruiting crops, an active hydroponic system is often more reliable.
Is Kratky Hydroponics Worth Trying?
Yes, Kratky hydroponics is worth trying if you want a simple, low-cost introduction to hydroponic growing.
It is one of the easiest ways to understand how plants grow without soil.
You will learn how roots behave in water, how nutrient solution works, why light matters and why oxygen around the roots is so important.
The best approach is to start small.
Grow one lettuce, one basil plant or one small herb. Watch the roots. Watch the water level. See how the plant responds.
Once you understand that, you can scale up to bigger containers or more plants.
Simple Kratky Hydroponics for Beginners Setup
For a first Kratky system, this is a sensible setup:
- One opaque or amber jar, tub or small bucket
- One net cup or secure lid
- One hydroponic sponge or plug
- Clay pebbles for support if needed
- Hydroponic nutrients
- One lettuce, basil or herb seedling
- A bright windowsill or small LED grow light
Fill the container so the nutrient solution just reaches the plug or young roots.
Once the roots grow down, let the water level fall naturally. Top up only when needed, and always leave an air gap.
That is the heart of the Kratky method: nutrient water below, oxygen above, roots between the two.
This kind of DIY setup is a good way to learn how Kratky works. But if you would prefer something neater for a kitchen, shelf or living space, a ready-made hydroponic system may be easier to live with.
Our guide to the best hydroponic growing systems in the UK compares beginner-friendly indoor systems for people who want a cleaner, more complete setup from the start.
Final Thoughts
Kratky hydroponics is not the most advanced hydroponic system, but that is why it is useful.
It removes most of the equipment and lets you focus on the basics.
For beginners, the best crops are lettuce, basil and small leafy herbs. They grow quickly, stay manageable and do not need a large reservoir.
Once you understand those, you can experiment with bigger containers, stronger lighting and more demanding crops.
If you want to try hydroponics without pumps, noise or complicated equipment, the Kratky method is one of the simplest places to start.
For broader background on hydroponic growing, the RHS guide to hydroponics is also worth reading. It covers the wider principles behind growing plants without soil, including nutrient solutions, pH and the importance of oxygen around the roots.