Insulating a greenhouse sounds straightforward: keep the warmth in, keep the cold out. In reality, UK greenhouses lose heat in a few very specific ways — and most insulation methods only address one part of the problem.
That’s why advice online often feels confusing or contradictory. Bubble wrap, fleece, thermal mass, thicker glazing — all of them can work, but only in the right situation.
This guide compares the main greenhouse insulation methods used in the UK, focusing on what each one actually solves, what it costs (in money, effort, or light), and when it genuinely makes sense to use it — especially in real conditions like clear spring nights, false warm spells, and high energy costs.
This isn’t a basic setup guide. It’s about strategy, not emergencies.
If you’re planning or upgrading a setup, this sits alongside our Greenhouses and Polytunnels Guide, which looks at structure choices, glazing, ventilation, and how different designs actually perform in UK conditions.
🌡️ What “Insulation” Actually Means in a UK Greenhouse
In UK conditions, greenhouse heat loss usually comes from three sources. Understanding these makes every insulation decision clearer.
🔹 Radiative heat loss (clear, cold nights)
On still, cloudless nights, a greenhouse rapidly loses heat to the sky. This is why temperatures can crash even after a mild day. Some insulation methods slow this loss around plants — but don’t significantly warm the air.
🔹 Convective heat loss (air movement and gaps)
Warm air escaping and cold air leaking in is often the biggest ongoing loss. Glazing choices and internal linings help by trapping air and reducing draughts. They don’t create heat — they simply help you keep what you already have.
🔹 Root-zone cold (often overlooked)
Plants frequently fail because their roots get too cold, not because the air temperature hits a dramatic low. Soil contact and thermal buffering matter far more here than extra layers on the glazing.
Key point: no single insulation method fixes all three problems.
🧠 Greenhouse Insulation Methods at a Glance
Different methods solve different problems:
- Horticultural fleece → protects plants from radiative frost
- Bubble wrap → reduces convective heat loss
- Thermal mass → smooths day–night temperature swings
- Ground planting → stabilises root temperature
- Thicker glazing / polycarbonate → reduces overall heat loss
The sections below explain when each one genuinely helps — and when it doesn’t.
🧺 Horticultural Fleece: Excellent for Frost, Limited for Warmth
Horticultural fleece is one of the most effective short-term protections available, but it’s often misunderstood.
What it actually solves
- Reduces radiative heat loss around plants
- Protects foliage from light frosts
- Creates a slightly warmer microclimate close to leaves
When it works well
- Sudden cold snaps in spring or autumn
- Unheated greenhouses
- Overnight protection for tender plants
Where it falls short
- It does not meaningfully raise air temperature
- It offers little benefit in prolonged cold spells
- Left on too long, it reduces airflow and light
Fleece works best as a short-term response to frost risk rather than a permanent layer — something we go into more detail on in how to protect greenhouse plants from frosts.
In UK conditions, fleece works best as insurance rather than insulation — ideal for risky nights, not for changing the greenhouse climate long-term.
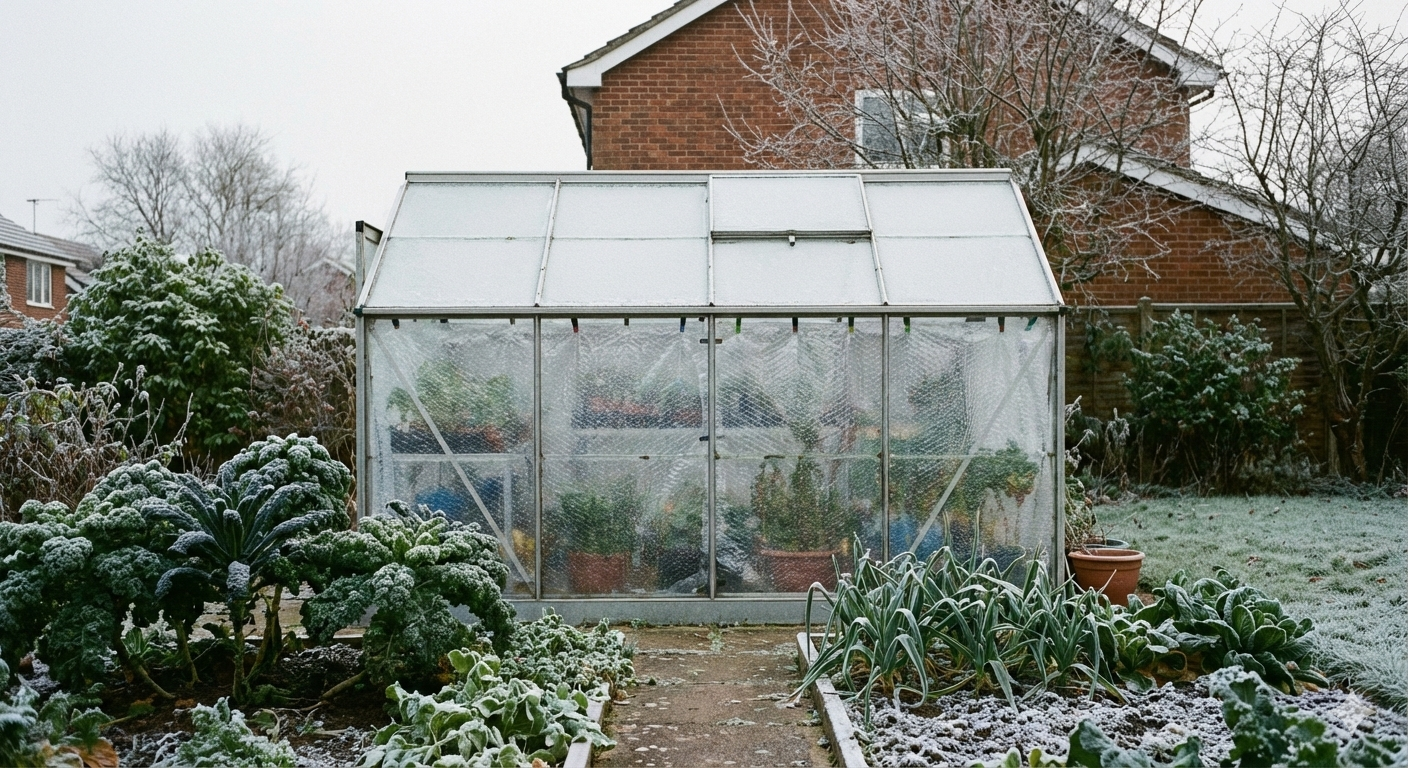
🫧 Bubble Wrap: Effective — with Important Trade-offs
Bubble wrap is probably the most widely recommended greenhouse insulation, and it can be very effective. But it isn’t a free win.
What it actually solves
- Reduces convective heat loss
- Helps retain warmth in heated or semi-heated greenhouses
When it makes sense
- You’re running some form of heating
- You want to reduce heat loss rather than raise temperatures
- Winter growth is minimal and light demand is low
If you’re heating a greenhouse at all, bubble wrap only pays off when it’s paired with sensible temperature control — something we cover in more detail in our guide on how to heat a greenhouse in the UK.
The real downsides
- Cuts light levels noticeably
- Can trap moisture
- Often delays spring growth if left up too long
⚠️ The Insulation Paradox (UK Reality)
The better you insulate a greenhouse, the more important ventilation becomes. In the UK, it’s often damp air, not cold, that kills plants. Even in winter, cracking a vent for 20–30 minutes on dry mornings helps flush out moisture and prevent grey mould (botrytis). A cold, dry greenhouse is usually healthier than a warm, soggy one.
The RHS also highlights that poor airflow and excess humidity are a major cause of winter plant losses in greenhouses, reinforcing why regular ventilation matters even in cold weather.
A practical note: standard packaging bubble wrap isn’t UV-stabilised and breaks down quickly. Large-bubble (around 30 mm) horticultural bubble wrap lasts longer and lets through noticeably more light than small-bubble sheets.
A smarter compromise
If you don’t want to wrap the whole greenhouse, insulate only the north-facing wall and gable ends. In the UK, most useful winter light comes from the south. You keep much of the heat benefit while sacrificing very little light.
🧱 Thermal Mass: Useful — but Easy to Overestimate
Thermal mass (water barrels, slabs, brick walls) is often presented as a low-cost way to “store heat”. It can help, but expectations need to be realistic.
What it actually does
- Smooths day–night temperature swings
- Releases stored warmth slowly overnight
When it helps most
- Early spring and autumn
- Greenhouses with decent sun exposure
- Combined with other insulation or light heating
The UK winter caveat
In deep winter, when there’s little sun, thermal mass can become a cold sink. Once water barrels drop to near-freezing, they can actually hold the greenhouse cold even if there’s a brief sunny spell.
For most UK growers, thermal mass works best from March onwards, when there’s enough sun to “charge” it properly during the day.
🌱 Ground Planting vs Pots: The Hidden Insulation Advantage
One of the most effective forms of insulation doesn’t look like insulation at all.
Why ground planting matters
- Soil acts as a large thermal buffer
- Root temperatures fluctuate far less
- Plants recover faster after cold nights
Compared with pots, ground-planted crops cool more slowly and often survive conditions that kill container plants. If winter or early-spring growing matters to you, where the roots are often matters more than what’s on the glazing.
This is one of the most overlooked — and cost-effective — insulation strategies available.
🪟 Glazing Choices: Thickness Beats Add-ons
If you’re choosing or upgrading a greenhouse, glazing choice has long-term impact.
- Thicker polycarbonate traps more insulating air
- Double- and triple-wall panels reduce heat loss year-round
- Light diffusion can actually benefit many crops
Retrofitting glazing is rarely cheap, but for new builds, glazing thickness often delivers more reliable insulation than temporary internal linings.
✅ What Actually Works Best (Depending on Your Situation)
There’s no universal “best” insulation — but there are sensible combinations.
🌬️ Unheated greenhouse in a frost-prone area
- Ground planting where possible
- Horticultural fleece for risky nights
- Accept slower growth rather than chasing warmth
🔥 Lightly heated greenhouse
- Bubble wrap (especially on north wall)
- Regular ventilation to control damp
- Focus on heat retention, not higher set temperatures
💷 Energy-conscious growing
- Insulate to retain, not create, heat
- Remove insulation promptly in spring
- Use insulation seasonally, not permanently
Often, less insulation used intelligently outperforms piling everything on at once.
🔌 Insulation, Heating, and Control
Insulation is only half the battle. If you’re using bubble wrap to save money, make sure your heater is controlled properly. A digital thermostat or smart plug prevents wasted energy — there’s little point insulating a space if your heater is still running at 15 °C when 5 °C would do.
Used together:
- Structure sets the baseline
- Insulation reduces losses
- Heating fills the gap
- Fleece protects plants during extremes
That’s how insulation actually pays off in real UK greenhouses.
💷 Cost Comparison: What Insulation Actually Costs (8×6 ft Greenhouse)
To put the options in context, the figures below show what the main greenhouse insulation methods typically cost for a standard 8×6 ft UK greenhouse. For smaller 6×4 ft setups, costs are usually around 20–25% lower, depending on layout and glazing. These are ballpark figures, but they reflect real-world UK prices.
Horticultural fleece
- Typical cost: £10–£25
- Ongoing cost: Low (reusable, but degrades)
- What you’re paying for: Short-term frost protection
- Best value when: You need emergency protection, not season-long insulation
Fleece is cheap and flexible, but it doesn’t change the greenhouse climate — it just protects plants during extremes.
Bubble wrap (horticultural, large bubble)
- Typical cost: £25–£45
- Ongoing cost: Medium (lasts ~3–5 years if UV-stabilised)
- What you’re paying for: Reduced heat loss and lower heating bills
- Best value when: You’re running light heating or extending the season
Packaging bubble wrap may look cheaper, but it rarely lasts and often costs more in the long run.
Thermal mass (water barrels, slabs)
- Typical cost: £0–£40
- Ongoing cost: None
- What you’re paying for: Temperature stability, not warmth
- Best value when: Used from spring onwards, not deep winter
Thermal mass is cheap to add, but its benefits are subtle and seasonal.
Ground planting (vs pots)
- Typical cost: £0
- Ongoing cost: None
- What you’re paying for: Root-zone stability
- Best value when: Growing overwinter crops or early spring plants
One of the highest return-on-effort insulation strategies available.
Thicker glazing / polycarbonate upgrade
- Typical cost: £150–£400+
- Ongoing cost: None
- What you’re paying for: Permanent efficiency
- Best value when: Buying new or planning long-term use
This is the most expensive option upfront, but the only one that improves insulation year-round without light loss.
🔎 The real takeaway on cost
For most UK growers:
- Fleece + ground planting gives the biggest protection per pound
- Bubble wrap only pays off if you’re heating
- Thermal mass helps stability, not survival
- Glazing upgrades make sense long-term, not as retrofits
Spending more doesn’t automatically mean growing better.
🌿 Final thoughts: Insulation as strategy, not upgrades
Most greenhouse insulation advice pushes you towards adding more: more layers, more materials, more effort. In practice, UK growing works best when insulation is treated as a strategic choice, not a permanent upgrade.
Often the biggest gains come from:
- understanding where your heat is actually being lost
- protecting plants during short extremes rather than chasing warmth
- removing insulation promptly when light matters more than heat
A lightly insulated, well-ventilated greenhouse that’s used deliberately will usually outperform a heavily wrapped one that’s damp, dark, and slow to wake up in spring.
That’s why the most effective greenhouse insulation is rarely about doing everything — it’s about doing the right few things, at the right time.